The idea behind is same with apps2sd scripts, linking applications to SD card's second partition but differs in two ways.
One, instead of linking /data/app folder (that means moving all applications), you can select applications that you want to move.
Two, it's an application which means has a user interface. You can manage your applications with few clicks.
Features:
- Create and remove link for apk, dex and lib files of the applications you select
- Automatically link newly installed apps (optional)
- Move any user apps to SD even though the app does not support moving to SD (a.k.a. "force move", for Android 2.2 and higher)
- Shows the apps that support moving to SD with native apps2sd (for Android 2.2 and higher)
- Set the default install location of the apps; auto, internal, or external (for Android 2.2 and higher)
- Batch link, unlink, reinstall, uninstall, "move to SD", "move to phone" functions (multi-select mode)
- Uninstall system applications (bloatware removal)
- Freeze and un-freeze system and users applications
- Convert system apps into user apps
- Convert user apps into system apps
- Integrate "Updated" system apps into system (ROM)
- Clear data and cache of the application
- Clear all apps cache at once (1-tap cache cleaner without being root)
- List applications, show detailed size information and link status
- Sort and filter applications
- Search applications by name
- Display available space information of internal storage, SD card and SD card 2nd partition
What you need:
- root permission.
- a second partition on your SD card.
Flashing to Stock
You must flash your phone with stock ROM, i do this because my previous ROM is cyanogenMod 7.2 so i must flash it first with odin, but if your previous ROM still using stock ROM, i recommend it to upgrade with baseband version S5660DXKT8. OK let start the step : (I know I've written a tutorial on how to flash your phone using odin)- Backup your application using titanium backup or my backup root. for this one i don't trust on nandroid backup.
- Remove your sd card from your phone, we do not want any mistakes that led to missing data on sd card
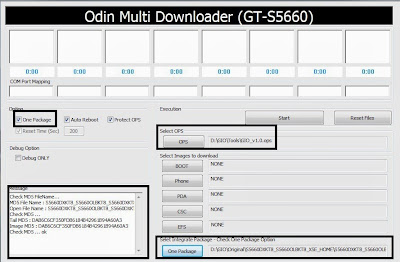
- Open your odin multi downloader, choose gio ops file, choose one package, choose your stock ROM.
- See on message box, if it show Check MD5....ok it means everything is ok and it ready for your to plug your phone.
- Go to downloading mode, by pressing power button + volume down button + home button (center button) while your phone off.
- If your phone already plug in, message will show you that it already detected your phone. if you see <1> Detected!! then you can click start button
- Wait until message box show <1> Pass!!!, <0> Destroy Instant..., <0> Killed timer and COM Port Mapping show PASS. Plug off your phone.
- See on message box, if it show Check MD5....ok it means everything is ok and it ready for your to plug off your phone.
- Go to recovery mode, by pressing power button + home button. select wipe cache partition and wipe data / factory reset after all done try to boot your phone let it until it show home screen so you can make sure your flashing is perfect.


Flashing PX- KERNEL-20120607-StockRom
This flashing px-kernel-20120607-stockrom file to your phone using clockworkMod recovery that already installed on stage 2. ok let start the process :- Copy px-kernel-20120607-stockrom to your sd card, copy it to your sd card root
- Go to recovery mode by pressing home button + power button, it mean you must restarting your phone.
- On recovery mode use volume up and volume down button to navigate and choose install zip from sdcard by pressing home button
- Choose choose zip from sd card and choose px-kernel-20120607-stockrom.zip finally choose Yes - Install px-kernel-20120607-stockrom.zip
- wait until process finish / complete
- reboot system now
- You will have custom boot screen and you phone now ready to use Link2Sd.
Install Link2SD and Activate it
This step will show you how to configure and activate link2sd, but before you must have 2 active partition on your sd card, if you don't know how to do it visit this section read section one. ok let start out tutorial :- Install link2sd from market, here
- Open link2sd and it will ask you "Select the file system of your SD card's second partition", select ext4
- Your device will be automatic restart after you press ok
- After restart open your link2sd again, press menu, setting select auto link
- Select Relink all application files, Relink library files, and Link dalvik-cache files
- Finish. now you have stock rom with link2sd active and configured
In that picture it show that /system still have less free memory, /system is the place where ROM placed it installation files, but you can delete it and free more space. you can visit this if you wanna know application that safe to remove from /system


